Replacing Failed Disks on RAID10 ZFS in Separate Arrays on Proxmox VE 9.x
A practical walkthrough for safely replacing failed disks in a degraded Proxmox VE 9.x ZFS RAID10-style setup, including partition backup, GUID randomization, disk replacement, and final pool health checks.
Replacing failed disks in a Proxmox VE 9.x ZFS RAID10-style pool is manageable as long as the failed disks are not from the same mirror pair. In ZFS terms, this layout is usually a striped set of mirror vdevs. It behaves like RAID10, but ZFS will show it as mirror-0, mirror-1, and so on under the pool.
This guide walks through replacing two failed disks from separate mirror vdevs on a Proxmox VE 9.x host. The example uses an rpool with four disks:
scsi0andscsi1inmirror-0scsi2andscsi3inmirror-1- failed disks:
scsi1andscsi3 - replacement block devices:
/dev/sdband/dev/sdd
The important rule is simple: one failed disk per mirror vdev is recoverable. Two failed disks in the same mirror vdev can make the pool unavailable.
Objective#
Replace multiple failed disks in a degraded Proxmox VE 9.x ZFS RAID10-style pool where each failed disk belongs to a different mirror vdev.
Prerequisites#
- Root shell access to the Proxmox node.
- A current backup of important VMs, containers, and host configuration.
- Replacement disks with equal or larger capacity than the failed disks.
- The pool must still have enough replicas to stay online.
- The failed disks must be identified clearly.
- A maintenance window is recommended, especially on production nodes.
Lab Layout#
In this example, Proxmox shows four 32 GB disks attached to the VM.

The ZFS pool is rpool. The pool uses two mirror vdevs:
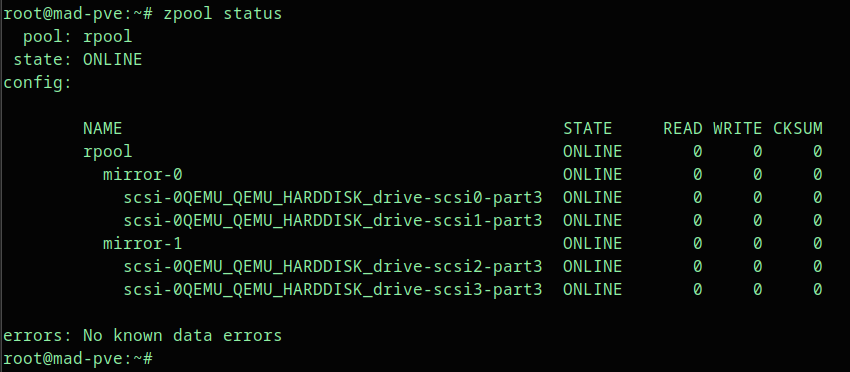
The initial healthy layout looks like this:
rpool
  mirror-0
    scsi-0QEMU_QEMU_HARDDISK_drive-scsi0-part3
    scsi-0QEMU_QEMU_HARDDISK_drive-scsi1-part3
  mirror-1
    scsi-0QEMU_QEMU_HARDDISK_drive-scsi2-part3
    scsi-0QEMU_QEMU_HARDDISK_drive-scsi3-part3
The /dev/disk/by-id/ mapping helps connect ZFS disk names to Linux block devices.

Use persistent paths from /dev/disk/by-id/ when possible. Names like /dev/sdb can change after reboot or hardware changes.
Important Safety Notes Before Replacing Disks#
Before running replacement commands, confirm the mirror layout.
Do not continue if both failed disks are in the same mirror vdev. In this example, scsi1 is from mirror-0 and scsi3 is from mirror-1, so the pool still has one healthy disk in each mirror.
Also confirm the replacement disk names. The commands in this guide use /dev/sdb and /dev/sdd because that is what the lab shows after the new disks are attached. Your server may use different names.
Run these checks first:
zpool status
lsblk
ls -l /dev/disk/by-id/
Expected result:
- The pool is
DEGRADED, not unavailable. - Each mirror still has one
ONLINEmember. - The replacement disks are visible and do not contain needed data.
Step 1: Check the ZFS Pool Status#
Start with zpool status:
zpool statusAfter removing a disk from one mirror, ZFS reports the pool as degraded but still functional.
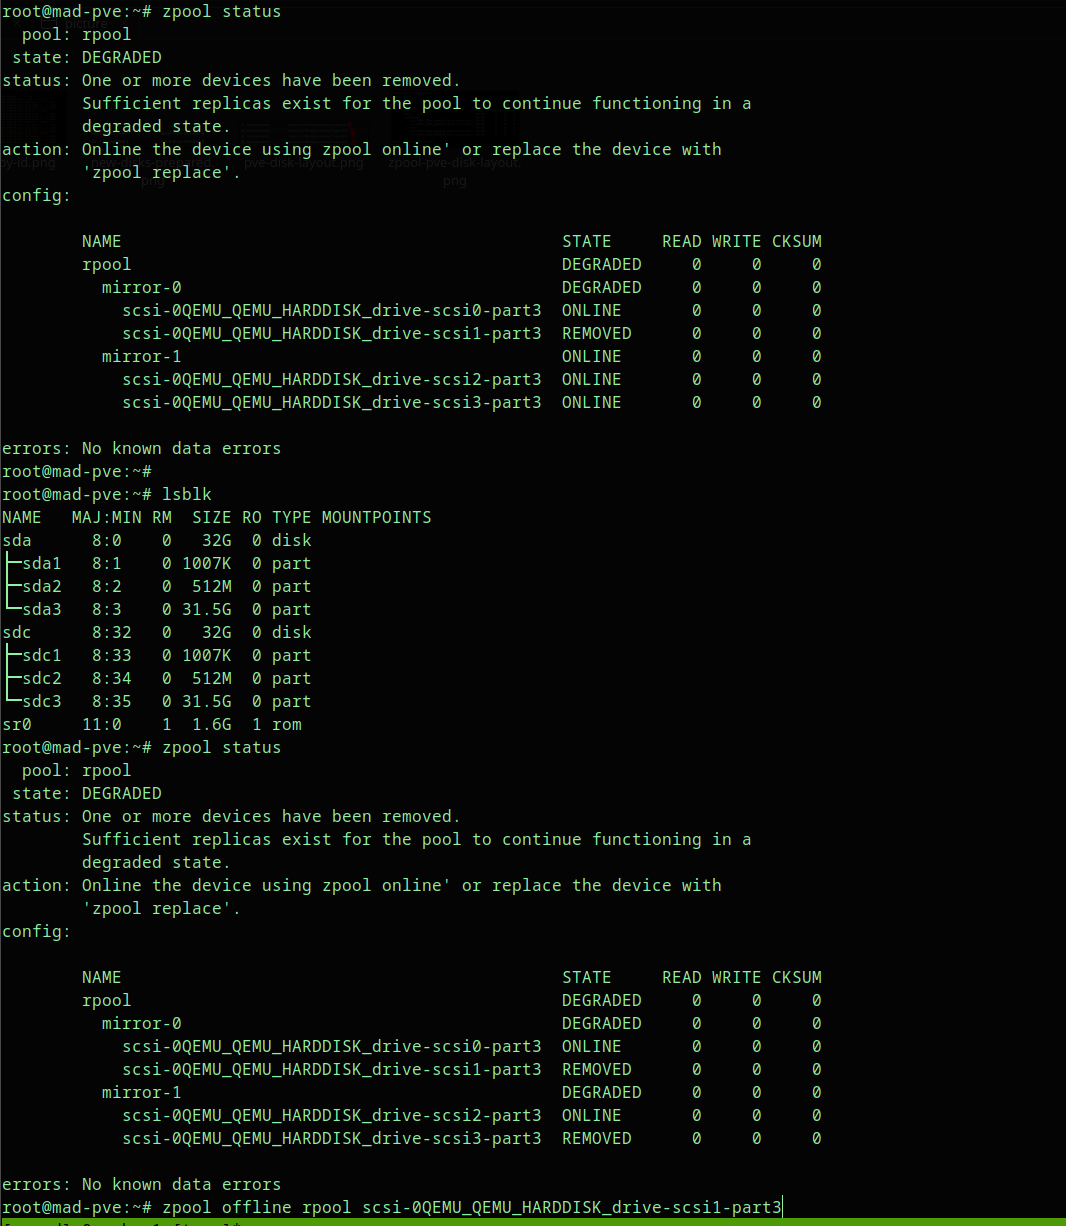
In this example, after removing disks from separate mirrors, the pool remains degraded:
pool: rpool
state: DEGRADED
config:

  NAME                                      STATE
  rpool                                     DEGRADED
    mirror-0                                DEGRADED
      scsi-...-drive-scsi0-part3            ONLINE
      scsi-...-drive-scsi1-part3            REMOVED
    mirror-1                                DEGRADED
      scsi-...-drive-scsi2-part3            ONLINE
      scsi-...-drive-scsi3-part3            REMOVED
This is recoverable because each mirror vdev still has one online disk.
Step 2: Confirm the Failed Disks Are in Separate Mirror Vdevs#
Look at the zpool status tree carefully. The indentation matters.
Safe example:
mirror-0
  disk A ONLINE
  disk B REMOVED

mirror-1
  disk C ONLINE
  disk D REMOVED
Unsafe example:
mirror-0
  disk A REMOVED
  disk B REMOVED
If both disks in the same mirror are gone, stop and restore from backup or seek a recovery path before changing the pool further.
Step 3: Offline the Failed Disks if They Are Still Visible#
If a failed disk is still visible to the OS but should no longer be used, mark it offline.
Example:
zpool offline rpool scsi-0QEMU_QEMU_HARDDISK_drive-scsi1-part3
zpool offline rpool scsi-0QEMU_QEMU_HARDDISK_drive-scsi3-part3
Then check again:
zpool statusThe screenshot below shows both failed members marked OFFLINE, one in each mirror vdev.
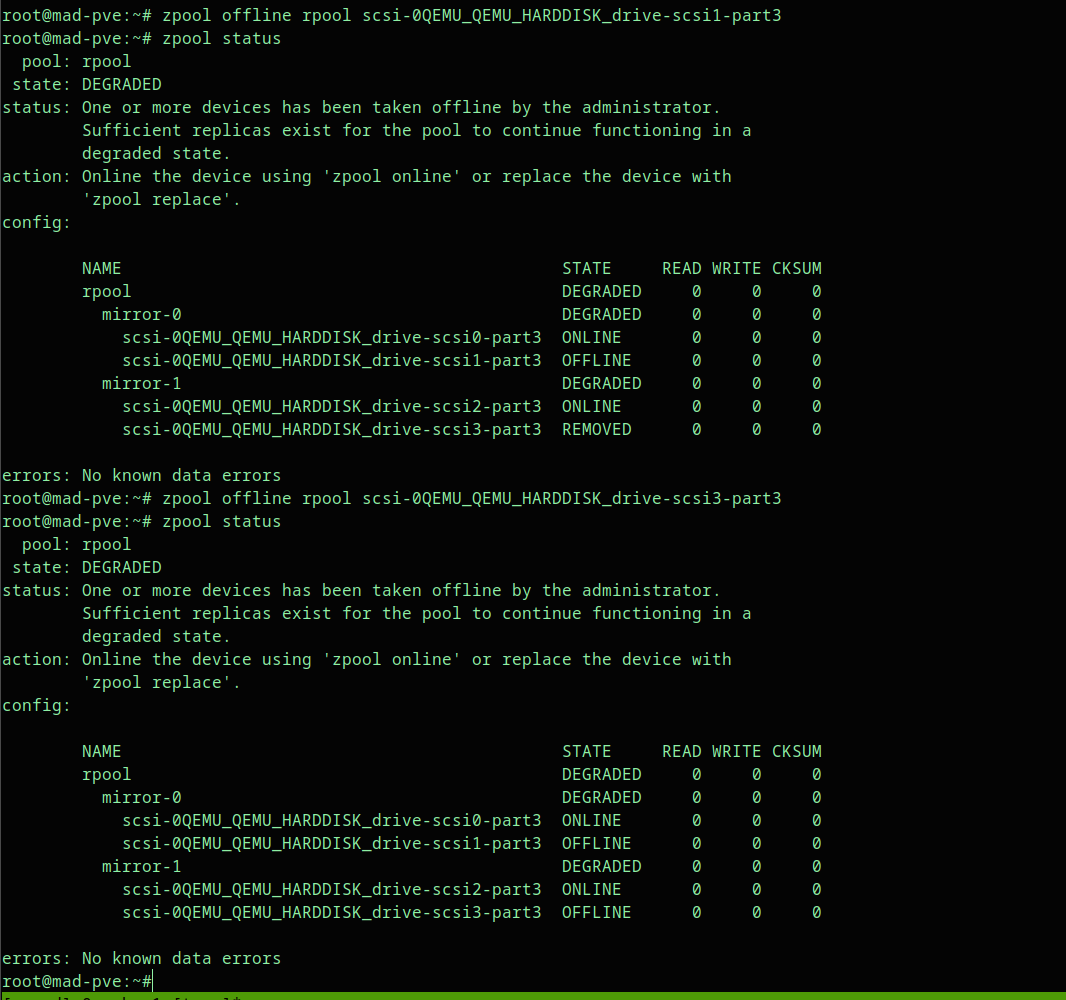
Expected output:
state: DEGRADED

mirror-0
  scsi-...-drive-scsi0-part3  ONLINE
  scsi-...-drive-scsi1-part3  OFFLINE

mirror-1
  scsi-...-drive-scsi2-part3  ONLINE
  scsi-...-drive-scsi3-part3  OFFLINE
Step 4: Attach the Replacement Disks#
Attach the new disks to the Proxmox VM or physical server.
In this lab, the old disks are still shown as unused disks, and two new disks are prepared for attachment.
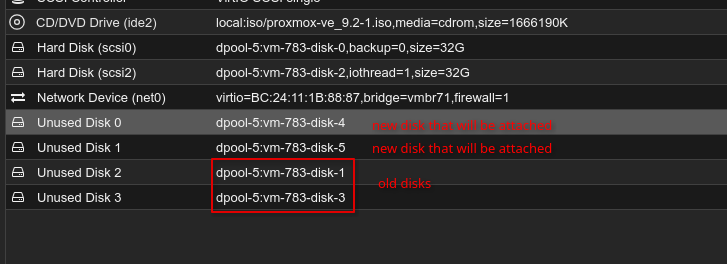
The new disks are attached as unused disks:

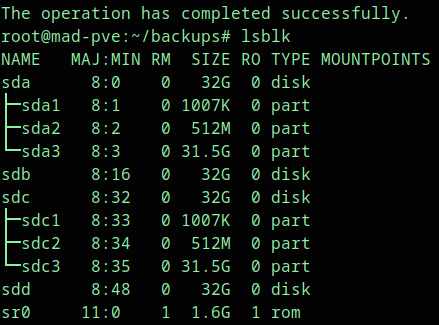
After attaching them, verify the block devices:
lsblkIn this example, the new raw disks are /dev/sdb and /dev/sdd.
Expected output pattern:
sda    32G disk
|-sda1
|-sda2
`-sda3
sdb    32G disk
sdc    32G disk
|-sdc1
|-sdc2
`-sdc3
sdd    32G disk
Here, /dev/sdb and /dev/sdd are blank replacement disks. The healthy existing disks already have the Proxmox/ZFS partition layout.
Step 5: Back Up the Partition Layout From a Healthy Disk#
Use a healthy disk as the partition layout source. In this example, /dev/sda is a healthy member and has the layout we want to copy.
Create a backup directory:
mkdir -p /root/backups
cd /root/backups
Back up the partition table:
sgdisk --backup=sda.part /dev/sdaVerify that the backup file exists:
ls -l
Expected output:
-rw-r--r-- 1 root root 17920 Jun 30 07:26 sda.partAlternative using sfdisk:
sfdisk -d /dev/sda > sda-partition-backup.txtFor this guide, the next step uses the sgdisk backup file.
Step 6: Restore the Partition Layout to the New Disks#
Restore the saved partition layout to the first replacement disk:
sgdisk --load-backup=sda.part /dev/sdb
sgdisk -G /dev/sdb
partprobe /dev/sdb
The sgdisk -G command randomizes the disk and partition GUIDs after loading the backup. This avoids duplicate GPT identifiers from the source disk.
Verify the result:
lsblk
Restore the same layout to the second replacement disk:
sgdisk --load-backup=sda.part /dev/sdd
sgdisk -G /dev/sdd
partprobe /dev/sdd
Verify again:
lsblk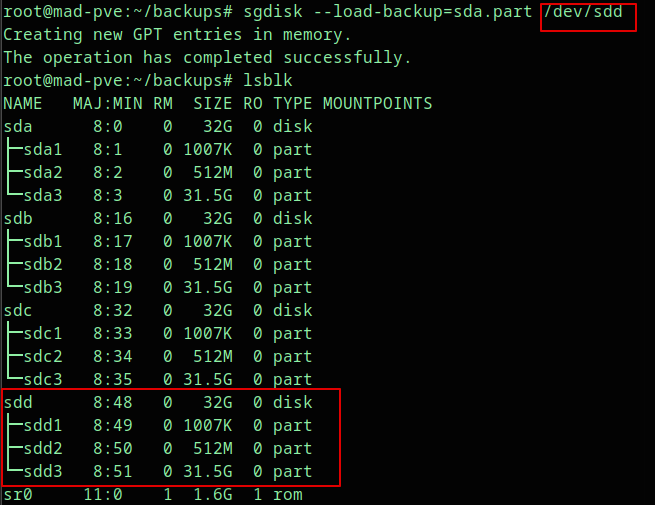
Expected result:
sdb
|-sdb1
|-sdb2
`-sdb3

sdd
|-sdd1
|-sdd2
`-sdd3
In this layout, partition 3 is the ZFS partition, so the replacements use /dev/sdb3 and /dev/sdd3.
Step 7: Replace the Failed ZFS Members#
Now replace each failed member with the corresponding new partition.
The example below replaces scsi1-part3 with /dev/sdb3, and scsi3-part3 with /dev/sdd3:
zpool replace rpool /dev/disk/by-id/scsi-0QEMU_QEMU_HARDDISK_drive-scsi1-part3 /dev/sdb3
zpool replace rpool /dev/disk/by-id/scsi-0QEMU_QEMU_HARDDISK_drive-scsi3-part3 /dev/sdd3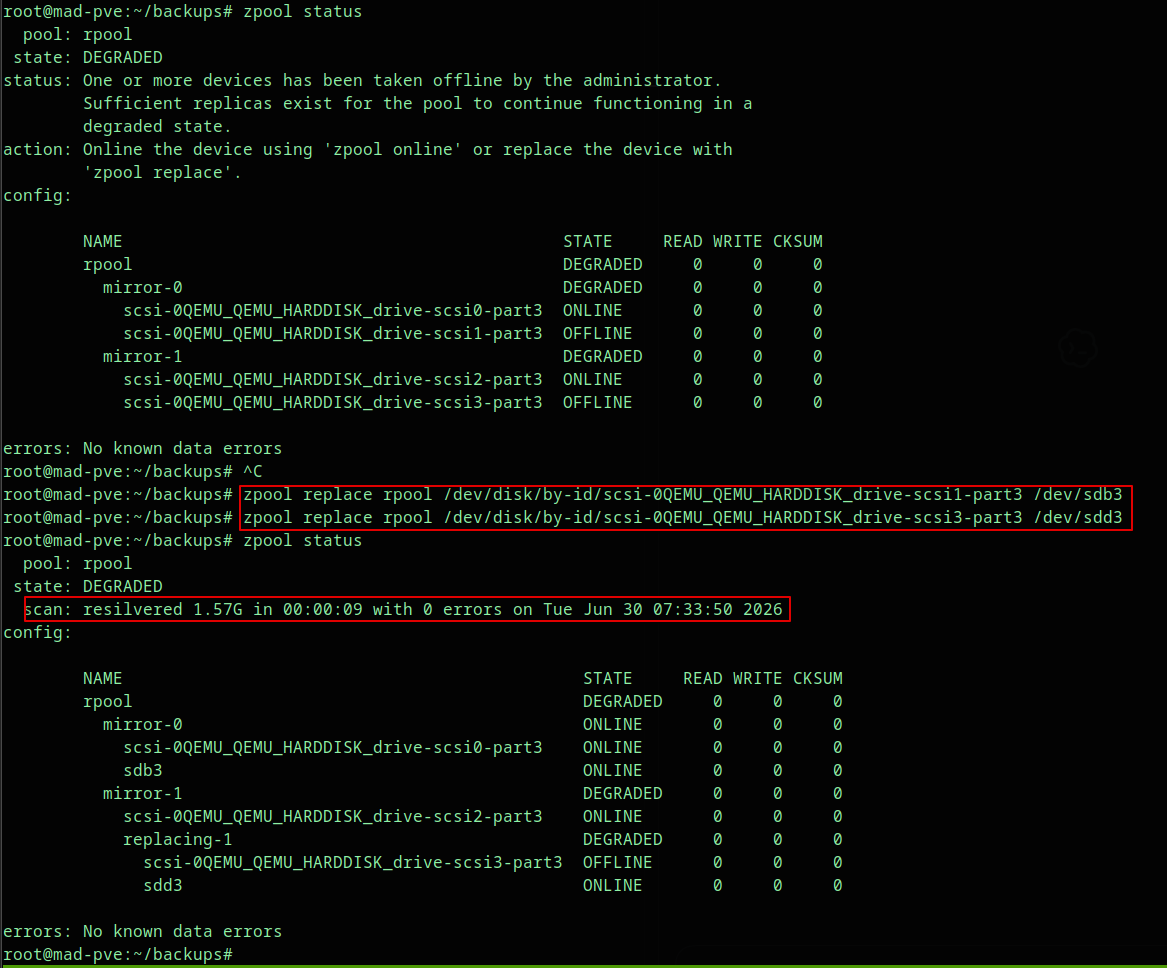
On production systems, replace one disk at a time if the pool is busy or the disks are large:
zpool replace rpool /dev/disk/by-id/OLD_FAILED_DISK_PART3 /dev/disk/by-id/NEW_DISK_PART3
watch -n 5 zpool status
Wait until the first resilver finishes, then replace the second failed disk.
Sequential replacement reduces I/O pressure and keeps the recovery easier to monitor.
Step 8: Monitor Resilvering#
Use:
zpool statusOr watch it continuously:
watch -n 5 zpool statusDuring replacement, ZFS shows resilver progress. In the lab screenshot, the resilver completed quickly because the disks are small:
scan: resilvered 1.57G in 00:00:09 with 0 errorsFor real disks, resilvering can take much longer. Keep the node powered on and avoid unnecessary restarts until ZFS finishes.
Step 9: Confirm the Pool Is Healthy#
After resilvering, run:
zpool statusThe final state should be ONLINE with no known data errors.
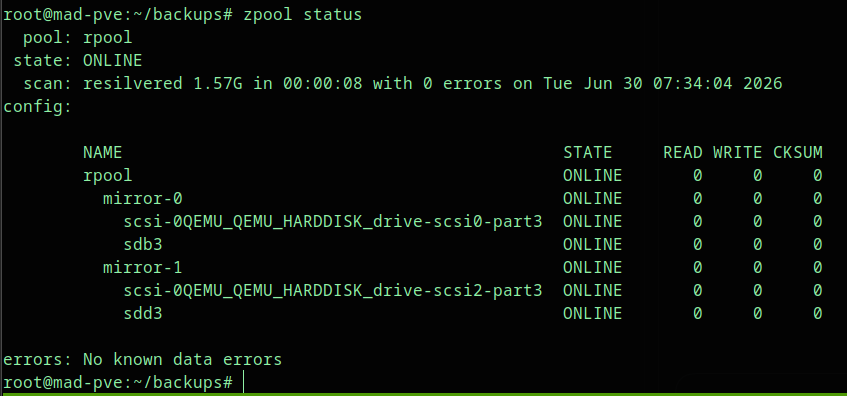
Expected output:
pool: rpool
state: ONLINE
scan: resilvered ... with 0 errors

config:

  NAME                                      STATE
  rpool                                     ONLINE
    mirror-0                                ONLINE
      scsi-...-drive-scsi0-part3            ONLINE
      sdb3                                  ONLINE
    mirror-1                                ONLINE
      scsi-...-drive-scsi2-part3            ONLINE
      sdd3                                  ONLINE

errors: No known data errors
At this point, the ZFS replacement is complete.
Reinstall the Proxmox Bootloader on Replacement Boot Disks#
If the replaced disks are part of a bootable Proxmox rpool, do not stop at the ZFS partition replacement. The EFI/System boot partition on each new disk may also need to be initialized.
Check the boot tool status:
proxmox-boot-tool statusFor a typical Proxmox ZFS boot layout, partition 2 is the EFI System Partition. In this example, that means /dev/sdb2 and /dev/sdd2.
Initialize the bootloader on each replacement disk only after confirming the correct partitions:
proxmox-boot-tool format /dev/sdb2
proxmox-boot-tool init /dev/sdb2

proxmox-boot-tool format /dev/sdd2
proxmox-boot-tool init /dev/sdd2
Then refresh and verify:
proxmox-boot-tool refresh
proxmox-boot-tool status
This step matters for hosts that must remain bootable after another disk failure.
Troubleshooting#
The pool is unavailable#
If zpool status shows the pool as unavailable, stop replacing disks. Confirm whether both members of the same mirror vdev failed. If they did, normal zpool replace recovery may not be enough.
The new disk is smaller#
ZFS replacement requires the new device to be at least as large as the old device used by the vdev. Use an equal or larger disk.
zpool replace says the device is busy#
Check whether the new disk has old filesystem signatures or ZFS labels:
wipefs -n /dev/sdb
wipefs -n /dev/sdd
Only wipe disks after verifying they are the correct replacement disks:
wipefs -a /dev/sdb
wipefs -a /dev/sdd
If the disk has old ZFS labels, also consider:
zpool labelclear -f /dev/sdb3
zpool labelclear -f /dev/sdd3
The new disk does not show partitions after sgdisk --load-backup#
Ask the kernel to reread the partition table:
partprobe /dev/sdb
partprobe /dev/sdd
If needed, reboot during a maintenance window.
The pool is online but still shows old device names#
Run:
zpool status
ls -l /dev/disk/by-id/
If the replacement used /dev/sdb3 or /dev/sdd3, the pool may show those names until the next import or reboot. This is usually not a functional issue, but persistent /dev/disk/by-id/ paths are easier to manage.
Security Notes#
- Keep a verified backup before touching disk partitions.
- Do not copy and paste disk commands without checking device names on your host.
- Prefer
/dev/disk/by-id/paths over/dev/sdXpaths for ZFS commands. - Do not run
wipefs,sgdisk --zap-all, orzpool labelclearon a healthy disk. - Use a maintenance window for production servers.
- Keep a console session available in case network access drops.
Rollback Notes#
Rollback options are limited once a disk replacement starts, because ZFS begins resilvering data to the new device.
If you notice a wrong command before running zpool replace, stop and re-check the block device mapping.
If you restored the partition table to the wrong new disk, wipe only that new disk after confirming it contains no needed data, then repeat the partition restore on the correct disk.
If the wrong replacement target was used in zpool replace, do not detach anything blindly. First run:
zpool statusConfirm which devices are online, which are replacing, and whether the original healthy mirror member is still present. If the pool is still redundant, you can plan a clean detach or another replacement. If redundancy is unclear, stop and preserve the current state for recovery.
FAQ#
Can I replace two failed disks at the same time in ZFS RAID10?#
Yes, but only if the failed disks are in separate mirror vdevs and the pool still has one healthy disk in each mirror. For production systems, replacing one disk at a time is safer because it reduces I/O pressure and makes resilvering easier to monitor.
What happens if both failed disks are in the same mirror?#
The pool may become unavailable because that mirror vdev no longer has a readable copy. Stop and restore from backup or use a dedicated recovery process.
Should I use /dev/sdb3 or /dev/disk/by-id/...?#
Use /dev/disk/by-id/ when possible. It is more stable across reboots. The lab uses /dev/sdb3 and /dev/sdd3 because those are the visible replacement partitions in the screenshots.
Why copy the partition layout before running zpool replace?#
Proxmox ZFS boot disks often have multiple partitions, such as BIOS boot, EFI System, and ZFS data partitions. Copying the partition layout keeps the replacement disk consistent with the original layout.
Why run sgdisk -G after loading the backup?#
sgdisk --load-backup can duplicate GPT identifiers from the source disk. Running sgdisk -G gives the replacement disk fresh GUIDs.
Do I need to run proxmox-boot-tool?#
If the replaced disk is part of a bootable Proxmox rpool, yes, you should check bootloader status and initialize the boot partition on the replacement disk when required.
Internal Link Suggestions#
- Link to a Proxmox VE backup and restore guide.
- Link to a ZFS pool health monitoring guide.
- Link to a Proxmox disk replacement SOP.
- Link to a guide about
/dev/disk/by-id/naming.
External Reference Suggestions#
- OpenZFS
zpool replacemanual: https://openzfs.github.io/openzfs-docs/man/master/8/zpool-replace.8.html - OpenZFS
zpool statusmanual: https://openzfs.github.io/openzfs-docs/man/master/8/zpool-status.8.html - Proxmox VE administration guide: https://pve.proxmox.com/pve-docs/
- Proxmox VE ZFS wiki: https://pve.proxmox.com/wiki/ZFS_on_Linux
CTA#
Need help validating your own Proxmox ZFS replacement plan? Collect zpool status, lsblk, and ls -l /dev/disk/by-id/ output before touching the disks, then review the mirror layout carefully so you replace the correct device the first time.